Subject Teacher: Anja Gharaibah
Contact: anja@askeris.no
Unit 5:

Reconstruction of the temple of Jerusalem, 15th century illustration
Perspective
Global Concept:
Orientation in Space and Time
Explorations: Epochs, eras, turning points and ”big history”
Explorations: Epochs, eras, turning points and ”big history”
Key Concept:
Perspective
Related Concept:
Innovation, Composition
Conceptual Understanding:
Three dimensional painting from one and more viewpoints as an innovation in perspective composition
Three dimensional painting from one and more viewpoints as an innovation in perspective composition
Statement of inquiry
Students will understand that three dimensional painting from one and more viewpoints was an innovation from Renaissance artists for perspective composition through an inquiry into the history of perspective painting and the exploration of perspective drawing.
Grade 8 has been working on their summative assessment, a "name-building" made of letters in 2-point perspective. With this project students will demonstrate their understanding of perspective and the representation of space.
Below some examples of class work:

Monday, 15.5.2017
Students continue to work on 2-point perspective exercises. We've now moved to 3-dimensional letters and started to draw letter formations ("name-buildings)".
Images below: Mariam, arteascuola.com
 |
| Image source |
Homework: due Monday 22nd
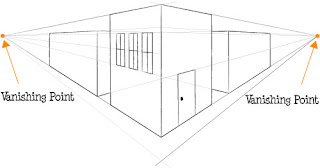
Complete the name drawing you have started in school. Draw 3-6 letters in 2-point perspective and create a building (see image above). Draw your horizon at the middle of the paper, add 2 vanishing points at the corners and draw 2 orthogonal lines from the left vp down to the bottom of the paper. These two orthogonal lines should ideally create three equal parts at the bottom line. (see image).

NOTE: For questions and support please come to the open artroom time on Thursday and Friday at 12.00-12.30.
Monday, 27.4.2017
Grade 8 students were introduced to the new unit: 2-point perspective. We did a little recap on 1-point perspective and worked on excercises and worksheets to understand two point perspective. Students also watched a video about the Renaissance artist and architect Fillippo Brunelleschi's and his first experiment on drawing in linear perspective.
Video: Brunelleschi's Experiment
Homework:
Draw a simple streetview: horizon, 2 vanishing points and at least 7 buildings of which one should be in the second row (behind the other buildings).


Unit 4:

Cubism
Art Movement
STATEMENT OF INQUIRY
Creativity understood as process and motor to create new art styles
Students will understand
creativity as process and motor for the development of new art styles
through an inquiry into
the composition of analytical and synthetic cubism.
Global Concept:
Personal and Cultural expression
Key Concept:
Creativity
Related Concept:
Style
Cubism
Art Movement
STATEMENT OF INQUIRY
Creativity understood as process and motor to create new art styles
Students will understand
creativity as process and motor for the development of new art styles
creativity as process and motor for the development of new art styles
through an inquiry into
the composition of analytical and synthetic cubism.
Global Concept:
Personal and Cultural expression
Key Concept:
Creativity
Related Concept:
Style
Monday 13th January, 2017
Homework: Complete your Preparation Worksheet
link to worksheet: (If you use the GoogleDoc instead of the worksheet, PLEASE MAKE A COPY BEFORE YOU INSERT!
https://docs.google.com/a/askeris.no/document/d/12nC8Gp68cS9BU-mrYPrxsPOwT_IGn6xCKgZJXdf1e-A/edit?usp=sharingCreativity understood as process to create new art styles
Task 1:
You are required to create a cubist inspired collage.
Preparation:
Choose at least five personal items (with different shapes) from your room. Your objects must reflect you and today’s culture.
Explain in detail why you’ve chosen your particular objects and what they mean to you.
Compare with items on a cubist collage of your choice (from Pablo Picasso, Georges Braque or Juan Gris).
Make connections. What do your objects tell about you or your room / what do the objects in the cubist original tell about the the artist or the scenery.
Before you create your final collage
1. Document your Process: make various sketches of your objects to explore different cubist techniques, alternatives, perspectives and solutions in your book.
Make sample collages to develop your composition. Glue or create in your book.
2. Describe your drawings: explain in detail how you are going to arrange and transform your items to create a collage
All sketches and samples must be made or glued in your book! Loose papers won’t be accepted!
STEPS to create your collage:
Background:
1. Take the photo copies of your items. Draw each object and cut it out to use as a template.
2. Prepare a background by overlaying different types of paper: newspapers, wrapping paper and coloured paper (or add paper of your own choice).
3. Place your templates on your background, let them overlap, and draw the outline with charcoal or pastel.
4. Colour or shade some of your shapes using media like paint, oil pastels or charcoal.
Composition:
5. Compose your collage with your personal items. You can draw, paint, or cut out and paste your objects. You may also use one of your images for your collage.
REMEMBER to apply the cubist techniques below! Choose at least one technique per object / item.
5. Compose your collage with your personal items. You can draw, paint, or cut out and paste your objects. You may also use one of your images for your collage.
REMEMBER to apply the cubist techniques below! Choose at least one technique per object / item.

Image reference: http://mhs.molineschools.org/srepling/general-art/general-art-semester-2/3-collage-cubism/cubism-worksheets/
Monday 6th January, 2017
Homework: prepare for test about cubism
Links for your study:
Monday 23rd January, 2017
Grade 8 learned about analytical and synthetic cubism, its most important figures Pablo Picasso, Georges Braque and Juan Gris, as well as its inspiration through post modernist Paul Cezanne.
Link to studied material
Homework: due Thursday, 26th January
Make personal item photos! Look around your room / your desk and collect objects that you like, that have a special meaning for you or simply things you use every day. Try to find items with different shapes, so you can assemble them in an interesting collage later on. These images will be used as drawing templates and/or part of your collage. Save and name your images under your name in a numbered order (e.g. Jon1, Jon2, Jon3...) and send them as attachment in ONE email until Thursday, 26th Jan! You will need these images to start your project on Monday!
Monday 16th January, 2017
Grade 8 students learned about the first abstract art movement, which is Cubism. To understand the underlaying principles of cubism, the students made an exercise, creating a collaborative collage in 15 minutes, using only paper, pastels and charcoal.


Homework: due Monday, 23rd January
In your art book draw a cubist still life including bottles, glasses, fruit bowls, books, musical instruments or other objects on a table. Apply different cubist techniques and use the handout you received in class as a guide. Fill one complete A4 page and add the date to your drawing (lower right corner).
Your home drawings will be part of your grade.
The works below may be an inspiration for you.

Juan Gris, Compotier and Bottle, 1917, MoMA
Monday 16th January, 2017
Grade 8 students learned about the first abstract art movement, which is Cubism. To understand the underlaying principles of cubism, the students made an exercise, creating a collaborative collage in 15 minutes, using only paper, pastels and charcoal.


Homework: due Monday, 23rd January
In your art book draw a cubist still life including bottles, glasses, fruit bowls, books, musical instruments or other objects on a table. Apply different cubist techniques and use the handout you received in class as a guide. Fill one complete A4 page and add the date to your drawing (lower right corner).
Your home drawings will be part of your grade.
The works below may be an inspiration for you.
 |
| Juan Gris, Compotier and Bottle, 1917, MoMA |

Juan Gris, Still Life, 1922

Juan Gris, Bananas, 1926
 |
| Juan Gris, Still Life, 1922 |
 |
| Juan Gris, Bananas, 1926 |
Unit 3:

The principle of design: Balance
Radial Symmetry / Print Making
Scientific and technical innovations can be based on systems composed by nature
STATEMENT OF INQUIRY
Students will understand the principle of art BALANCE through an inquiry into radial symmetry found in nature and adapted as an art technique through print making.
QUESTIONS OF INQUIRY:
Factual:
What are the principles of art?
What is radial symmetry?
Conceptual:
How is Balance achieved through symmetry?
How are radial symmetric patterns composed?
Debatable:
Are technical innovations always inspired by nature?
Global Concept:
Scientific and technical innovations
Key Concept:
Systems
Related Concept:
Composition
Link: assessment task
Monday 21st November, 2016
Students were introduced to the different types of Balance:
Symmetrical Balance
Asymmetrical Balance
Radial Balance (Radial Symmetry)
See this video! to understand radial symmetry
Homework for 28.November and 05. December:
Create radial symmetry doing the following:
Take an A4 Paper, fold a square and cut off the leaving strip. Fold your square into 8 equal sections:


2.) Trace your pattern with a soft pencil.
3.) Fold triangle on top of the next section on your square and rub graphite from the backside of the paper to copy onto the next section.

4.) Continue with step 2.) and 3.) until your square is filled with a radial symmetric pattern.


Make different "tiles" (squares) trying at least 3 different approaches to create a pattern with radial symmetry. Make sure that some of your lines and shapes are cut off the edges.
On the 1st triangular section draw:
1.) Lines: straight, zigzag, curved
2.) Name: write your name (or a word) like in the example shown above
3.) Shapes: draw shapes and fill the space of your triangle (organic shapes work well)
4.) Lines and Shapes: combine lines and shapes (have a look at the Mandala video below - pause the video at any point and try to copy part of a pattern on 1 triangle)
 |
| shapes |
 |
| Lines and shapes |
Coloured Light Mandalas
Try this link - a software that creates radial symmetric designs
Unit 2:
Chiaroscuro
 |
| Allegory of Vanity by Trophome Bigot 1650-1699 |
Statement of inquiry
Students will understand that
the invention of oil paint led to new techniques in painting
through an inquiry into
the treatment of light and shade with Chiaroscuro, a technique developed by Renaissance artists.
Global Context: Scientific and Technical Innovations
Key Concept: Form
Related Concepts: Innovation, Genre, Composition
Questions of inquiry:
Factual:
What is Chiaroscuro?
What is a still life and how is it composed?
What are light and dark values?
What are the two kinds of shadows?
Conceptual:
How do light and shadows visually define objects?
Debatable:
To what extend has chiaroscuro influenced modern art and media like photography and cinematography?
OBS! Summative assessment extension till Wednesday 23rd November
Students can work on their jars during after art class on Monday 21st, 12.00-12.30 and on Tuesday 22nd during Lunch in the grade 8 classroom 12.30-13.15
Rubric
Monday, 7thNovember, 2016
One period lesson time due to Author visit
Students reviewed what is Chiaroscuro.
Homework: due 14th Nov.

Monday, 31th October, 2016

Monday, 24th October, 2016
No art today, due to UN day.
Monday, 17th October, 2016
Students can work on their jars during after art class on Monday 21st, 12.00-12.30 and on Tuesday 22nd during Lunch in the grade 8 classroom 12.30-13.15
Rubric
Monday, 7thNovember, 2016
One period lesson time due to Author visit
Students reviewed what is Chiaroscuro.
Homework: due 14th Nov.
- In your home drawing book:
-
- Copy the three shapes and add light and shade.
-
- Have a close look and analyse the image first before you start drawing and shading:
-
- Can you identify the different shades?
-
- How many different tones do you identify?
-
- Where is the light, the highlight, the core shadow and where the reflected light?

Monday, 31th October, 2016
Grade 8 students learned to apply light and shadow on objects and to create a chiaroscuro effect with contrasting paper as fore-and background.
Homework:
Copy the three geometrical forms in your home drawing book and add light and shade.

No art today, due to UN day.
Monday, 17th October, 2016
This lesson students used their new skills to create value for the drawing of a sphere. They applied a chiaroscuro technique of light and shadow. These examples show great efforts!


Monday, 10th October, 2016
We started our new unit today. Grade 8 students learned how renaissance artists developed new painting styles using the newly invented oil paint. We had a closer look at the chiaroscuro technique and how painters used light and shadow to emphasise certain parts of a scene.


Create a value scale and practise shading.
Unit 1:
Statement of inquiry:
Pop artists celebrated commonplace objects and people of everyday life to blur the boundaries between "high" art and "low" culture.
Global Context: Personal and Cultural Expression
Key Concepts: Culture
Related Concepts: style, visual culture
Questions of inquiry:
Factual: What contributed to the creation of Pop Art?
Conceptual: How did Pop artists respond to their time and culture?
Debatable: Is Pop Art an enthusiastic reflection of the capitalist market and the goods it circulated or is it rather a cultural critique?
Monday, 26th September, 2016
Grade 8 proudly presents: Roy Lichtenstein inspired portraits:


Monday, 26th September, 2016
Grade 8 proudly presents: Roy Lichtenstein inspired portraits:


Monday, 12th September, 2016
Can you tell if someone is lying? There are some indicators if someone is cooking up a lie. But how about objects? Can you see if a painting is original or a fake?
How can art forgers fool so many experts, museums, and art collectors around the world?

Michelangelo began his career forging ancient Roman sculpture!
This is a story of the best forger the art world has ever seen...
Wolfgang Beltracchi
What, if this is not a Warhol...?

Is it still Pop Art?
Can you trust your source?
Verify your information!
Use official sources like publications from:
Governmental and other
official Organisations
Museums
Newspapers / Magazines
Homework:
Monday 19th: Fill in all facts about PopArt. Browse the web or read the PopArt links provided in the ART folder
Thursday 22nd: Decide on a summative project and find the details for your preparation here:
preparations for your creative summative assessment project
Save your images here: Art folder/ your images
Save your images here: Art folder/ your images


Remember to create continuous dot lines across the paper.
Monday, 5th September, 2016
This Monday Grade 8 students continued their Roy Lichtenstein inspired Pop Art portraits.
To draw equal dots in a succession of straight lines seems easier than it is. But the results so far look quite promising. Keep going!
Homework:
Read the the handout or digital copy: When Pop Art Gets Critical: Andy Warhol
Write and summarise the text parts from document 2 below (Text and Vocabulary) in your own words. Can you explain what Warhol aimed for in his art?
Monday, 29th August, 2016
Today Grade 8 learned about another Pop Art artist: Roy Lichtenstein.
We also started our first creative Pop Art project - portraits inspired by Lichtenstein.
With their self portraits or images of popular people, students drew the contour lines of their face focusing on the most important features.
These line drawings will be copied on white paper and then illustrated/ coloured in the typical Lichtenstein comic style.


Homework:
All students are to take (or let someone else take) another portrait of themselves. Remember: daylight and contrast when you take your photograph!
Send ti Miss Anja until THURSDAY, 1st September (this week)
...Watch this...
Below you find a very interesting video with Roy Lichtenstein, who defines, what Pop Art is meant to be and explains his intentions to do Pop Art. He also gives an insight into his techniques and works.
Interview with Roy Lichtenstein
videos watched in class today:
link to video 1
link to Video 2
Monday, 22th August, 2016
Today students were introduced to their first unit of inquiry about Pop Art.
Students watched introduction videos about Pop Art and the Artist Andy Warhol. We talked about the time in which Pop Art emerged and tried to answer our first inquiry question.
Students then discussed if there is a better art than the other and compared Leonardo Da Vinci's Mona Lisa with Andy Warhol's "The King of Pop prefers Campbell's" - VERY INTERSTING points - To Be Continued...

 |
| Leo's Mona |
old or new
in or out
skilled painter or
anyone could do?
Is it about quality or is there a message…?
Link to video: Modern Masters - Andy Warhol
Homework: take a digital portrait photo of yourself and send it to Miss Anja til Thursday THIS week (25th August).
Monday, 15th August, 2016
Our 1st art lesson started with an art quizz about all kinds of art and art styles across the world and times.
Students then created a collaborative in a Pop Art style.

Homework:
Read handout pages 1-5 (document can also be found on the shared Asker MYP drive - G8 Arts)
by the way, there are some Kurt Schwitters’ works at Henie Onstad Kunstsenter, which were influented by 'Cubism'.
ReplyDelete